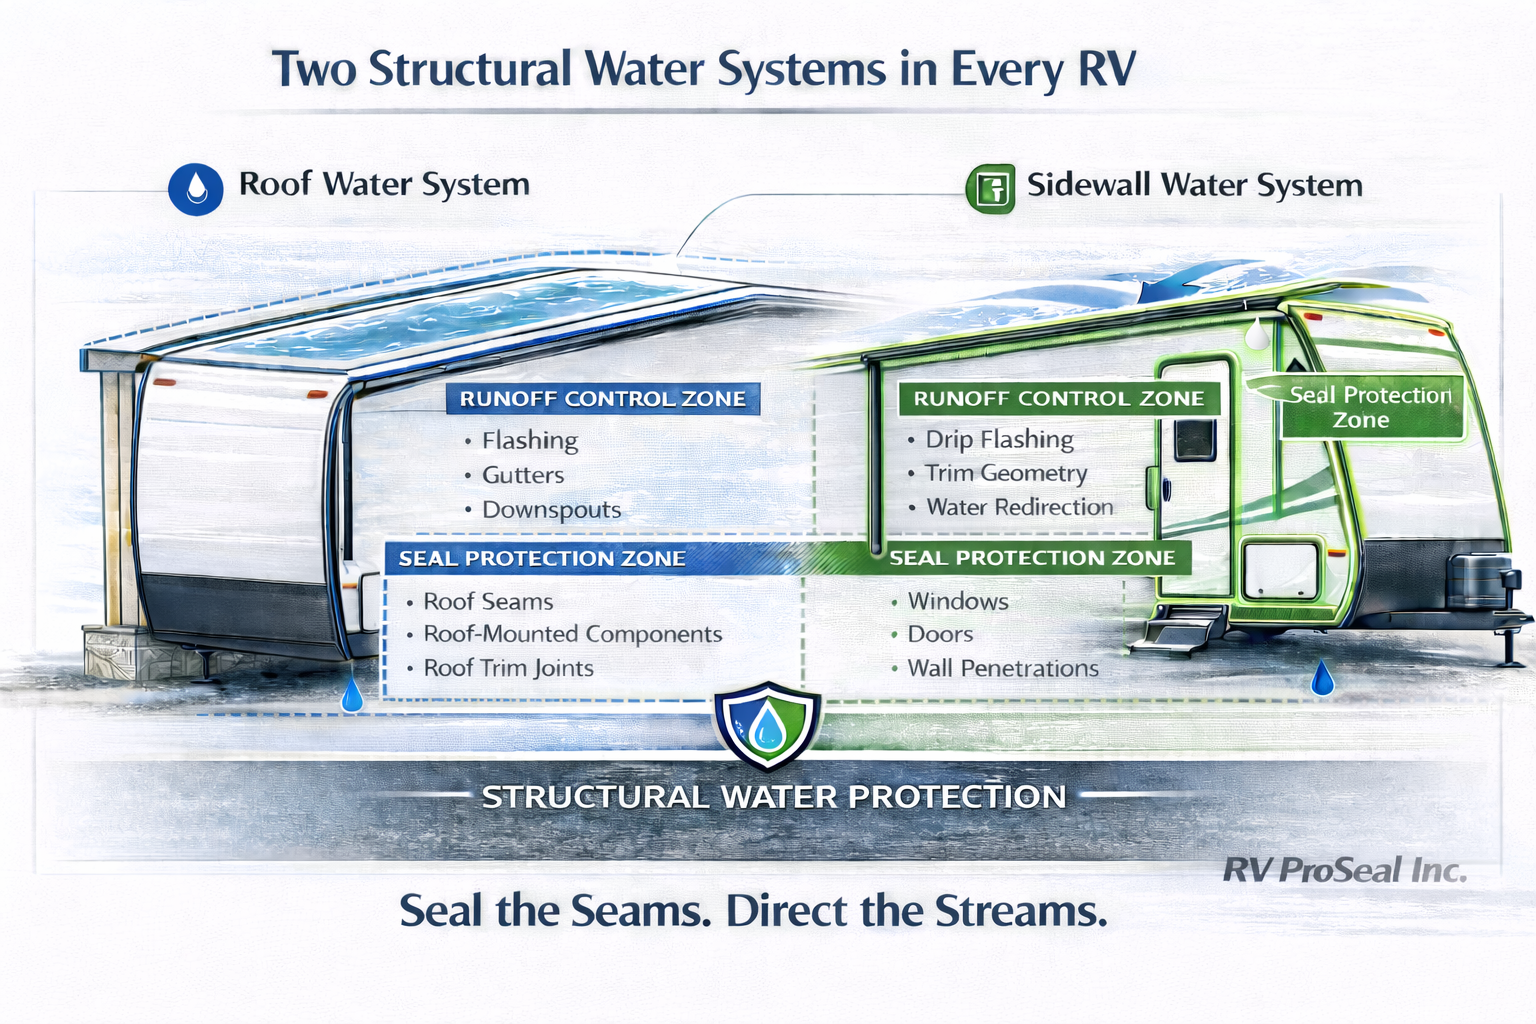
HOW TO ASSESS RV WINDOWS FOR LEAKS

David Pollard • August 19, 2020

What’s a leak? 

In general, a leak is: 

(A) Water infiltration between the stationary glass and the window frame. 

(B) Water running down the inside of a ventilating pane 

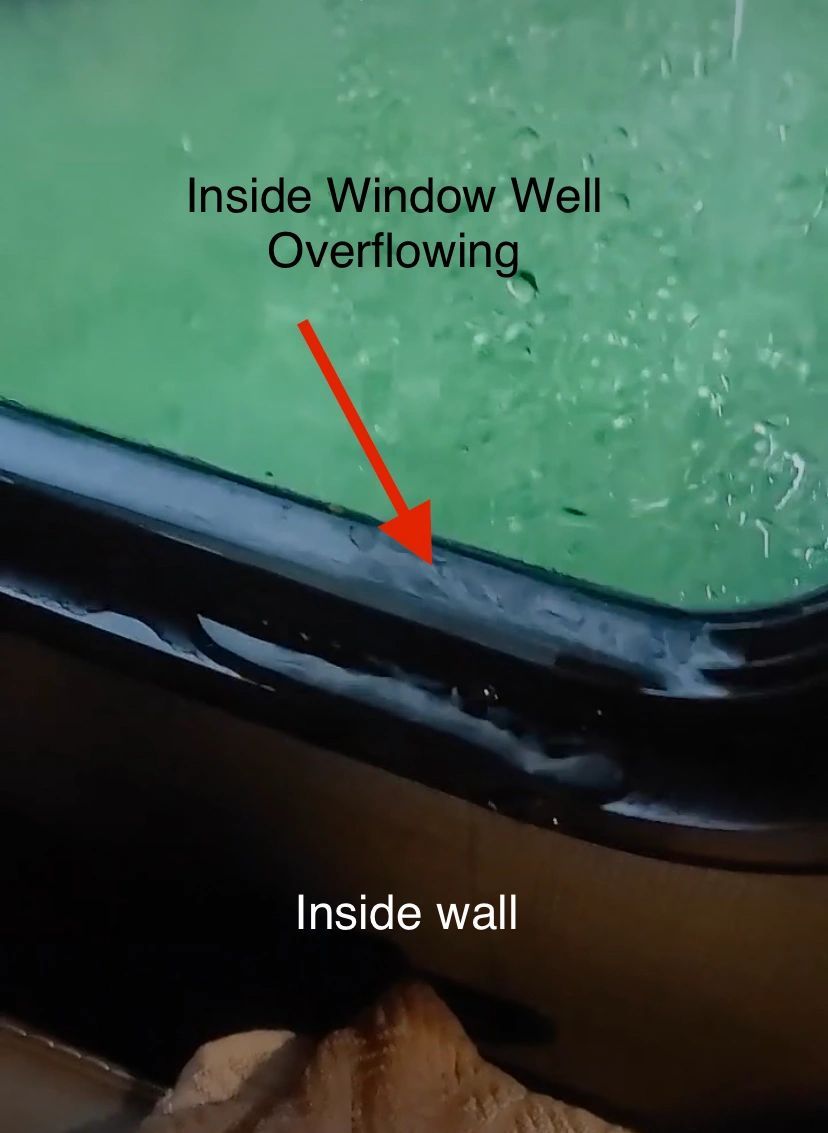
(C) Any condition where water accumulates in the windowsill overflows and runs down the inside wall. 


The following are not automatically leaks: 

(A) Presence of water in the windowsill. Ventilating windows will often admit some water; this is particularly true when subject to direct high high-pressure lows. They are designed to manage the water that comes in during average storm events and normal vehicle washes. They cannot withstand submersion, nor extraordinary flow velocities and volumes. All ventilating sliding windows and many awning-type windows are provided with "weep slots" or "drain slots." These allow any water coming in, whether through bypassing the opening pane, or from condensation, to drain out, rather than be trapped inside the vehicle. 

(B) Water running down the inside wall. If water appears between the window frame and the clamp ring, there is an installation leak or the water is coming through the wall. Installation leaks occur when the window flange has not been properly bedded; when the frame bedding has become brittle or has been breached, such as by racking off the unit wall; improper hole cutouts, causing insufficient coverage by the mounting flange; and walls curved, preventing a continuous seal under the window flange; Water leaks through the wall may originate in several areas, often remote from the window. Examples are: improperly sealed clearance lights and seams in sidewall skins. 

(C) Glass glazing vinyl gaps; in most cases, the glazing vinyl is cosmetic only and does not seal. Look for gaps in the bedding under the glass. If present, they should be lightly caulked, allowed to set up, and the vinyl replaced. 

Inside window well overflowing with water

What can I do? 

Window replacement is not always the best option when leaks appear. In many cases, removal and replacement will cause new aesthetic problems, which the vehicle owner may not be satisfied with. 


Things to check for: 

(A) Is the window properly closed? Sliding window latches usually include an interlock so that the sliding pane and the mullion fit together tightly. If either is bowed away from the other, the parts may by-pass, precluding a tight seal. Pushing outward when sliding the window closed can check this. If the vent stops earlier than it had previously, the seal has probably been restored. Often, the bowed part can be gently bent back into the proper position. Torque or awning windows may not seal for a variety of reasons: If the operator knob is stripped or cracked, the panes will not close fully. The vent seals are subject to deterioration over time. Replacing them, if indicated, will improve vent closure. Most vents have an adjustment feature. If the vent has “triangular” pivot brackets, be sure that the bottom adjustment hole is used. This will tighten the vent closure. 

(B) Can the water evacuate? Most sliding windows have a sloped sill (which will channel any water present outbound) and weep or drain holes (to permit the water to flow out.) These holes are usually baffled or otherwise disguised on the inside to minimize wind noise or “blow-back” in strong winds. Often, dirt or manufacturing debris will accumulate over time, blocking the drain, so that water cannot escape. To fix this condition: from outside the window, unsnap the weep hole covers, if present, but keep them handy for reuse. Use a stiff wire to probe into the weep hole, and scrape out anything blocking the sill. When you are sure that the area is clear, reinstall any weep slot covers. 

(C) Where is the water entering?

A process of elimination can be used to isolate the leak. Using duct tape, cover all suspected points of entry for water. If the leak persists, the water is entering elsewhere. If the leak stops, isolate the leak by removing one piece of tape at a time until the leak reappears. Depending on the leak source, various strategies can be employed, such as caulking, re-bedding, vinyl replacement, etc. 

(D) Is the window installed correctly? Radius windows are usually installed with an inside clamp ring. This part is screwed together with the window frame, clamping the wall between them. The clamp rings vary, depending on the wall thickness specified by the manufacturer of the vehicle. This wall thickness must accommodate the actual wall materials, plus whatever sealant is used under the outside window flange. If the clamp ring used is too thick, the window will not clamp tightly to the wall. When this happens, the flange seal can be easily breached and a leak occurs. If the window flange is not snug to the sealant around the outside, and the clamp ring not snug to the inner wall, you should order a replacement clamp ring. In general, a clamp ring is better if slightly too thin for the wall, rather than too thick. 

(E) Air leaks and wind noise: Unless the window also leaks water, wind noise should not be assumed to be a true leak. Excessive interior noise may be a function of vehicular design. A contributing factor can be the shape and placement of outside accessories such as mirrors. Replacement of the window will not affect wind noise when this case applies.


RV ProSeal 

Knowing what to look for is only part of the battle. RV windows are a part of our RV leak inspection testing. We repair and replace the glass glazing vinyl also. Learn more about what we do.


Make sure its done by a processional. Check out why DIY Caulking can be a nightmare when it rains.

You might also like

June 20, 2025
Have you ever considered your RV more than just a vehicle? For many of us, it is a mobile home, an adventure base, and a significant investment. Like any valuable asset, your RV needs consistent care to stay in top shape and serve you for years. Regular RV resealing services are one of the most overlooked yet absolutely critical aspects of RV maintenance. This simple process can dramatically extend your RV's lifespan and save you from major headaches. The Unseen Threat: Why RVs are Vulnerable to Leaks Imagine your RV cruising down the highway, basking in the sun, or weathering a rainstorm. All these conditions put stress on its exterior. Temperature changes cause materials to expand and contract, road vibrations challenge every seam, and even seemingly harmless sun exposure can degrade sealants over time. These factors create tiny openings, almost invisible to the naked eye, where water can start its insidious journey into your RV's structure. So, what happens when water gets in? Structural Damage: Water can rot wooden frames, delaminate walls, and corrode metal components, weakening your RV's integrity from the inside out. Mold and Mildew: A damp environment is a perfect breeding ground for mold and mildew. These not only create unpleasant odours, but they can also pose serious health risks. Electrical Problems: Water and electronics do not mix. Leaks can short-circuit wiring, leading to costly repairs and potential safety hazards. Reduced Resale Value: A water-damaged RV will fetch a much lower price when it comes time to sell. No one wants to buy a rig with hidden issues. This is why proactive care, like consistent resealing and swift RV water leak repair , is not just about comfort; it is about preserving the very foundation of your investment. The Power of Prevention: How Resealing Keeps Your RV Healthy Regular resealing acts as a robust shield, guarding your RV against the elements. Think of it like giving your home a fresh coat of paint to protect it from the weather. Properly applied sealants create a watertight barrier over every seam, joint, and penetration on your RV's exterior – from the roof and windows to the cargo doors and vents. When you invest in professional resealing, you are not just getting a quick fix. You are ensuring: Long-Term Protection: High-quality sealants are designed to withstand UV rays, extreme temperatures, and vibrations, offering durable protection for years. Early Detection: During a resealing service, technicians meticulously inspect every inch of your RV, often catching potential issues before they become major leaks. This attention to detail is crucial for effective RV water leak repair . Expert Application: To use sealants properly, you need to know how to do it and have the right tools. Experts make sure there is good bonding and a smooth, even seal that really keeps water out. Tips for Keeping Your RV Leak-Free Want to be proactive about protecting your RV? Here are a few straightforward tips: Regular Visual Inspections: Get up on a ladder a few times a year and visually inspect all seams and sealants on your roof and sidewalls. Look for cracks, shrinking, or areas where the sealant has pulled away. Feel for Soft Spots: Inside your RV, gently press on the walls and ceiling, especially near windows, vents, and lights. Any soft or spongy areas could indicate water damage. Address Issues Immediately: If you spot a problem, do not wait! Even a small drip can quickly escalate. Prompt RV water leak repair can save you thousands in the long run. Professional Check-ups: Consider having your RV professionally inspected and resealed every 2-5 years, depending on usage and climate. This is especially important if you are not comfortable doing the inspections yourself. By committing to regular resealing and partnering with a trusted RV leak testing company in Oakville , you are not just performing maintenance; you are making a wise decision that protects your significant investment. You are ensuring more enjoyable trips, fewer headaches, and a higher resale value when the time comes. Are you ready to give your RV the long, healthy life it deserves?
March 24, 2025
RV Inspection Services Myths Busted: Find the Right Experts
Rv inspection services
By Designer Green Lotus March 11, 2025
Why You Need RV Inspection Services Ever wonder what's really going on under the hood (or on the roof!) of your RV? It's more than just a vehicle; it's your home away from home, your ticket to freedom and adventure. Like your house, your RV needs regular check-ups to stay in tip-top shape. That's where RV inspection services come in. They're like a health check-up for your RV, ensuring everything is working as it should be and catching any potential problems before they become major headaches (and wallet-draining expenses!). You may be wondering, "Can't I just inspect my RV myself?" Sure, you can perform some basic tests, and we'll discuss some DIY tips later. However, a professional RV inspection service brings a whole new level of knowledge and thoroughness to the table. They have the skills, experience, and specialized tools to uncover concerns you might overlook. Consider this: You can take your own blood pressure at home, but you still need to go to the doctor for a complete physical, correct? The same approach applies to your RV. So, what exactly do RV inspection services cover? Well, it's a pretty comprehensive process. They'll typically check everything from the roof to the tires, including: Exterior: Checking for dents, scratches, and any signs of damage. Roof: A thorough RV roof inspection services check for leaks, cracks, or damage to the sealant. This is super important because a leaky roof can lead to significant water damage inside. Think mold, rot, the whole nine yards. Interior: Check appliances, plumbing, and electrical systems to ensure everything works correctly. Imagine finding out your fridge isn't working on day one of your big trip! Undercarriage: Inspecting the frame, suspension, brakes, and other components underneath the RV. LP System: Check for leaks and ensure proper operation of the propane system. Safety first! These are just some of the things a professional RV inspection company will examine. They will give your RV a complete once-over and ensure that it is in tip-top condition. Now, let's talk about why hiring a professional RV inspection service is such a good idea. Here are a few key benefits: Peace of Mind: Knowing your RV has been thoroughly inspected by a professional gives you peace of mind while on the road. You can relax and enjoy your trip without worrying about unexpected breakdowns. Safety: RV inspections can identify safety issues that you might not be aware of, such as faulty brakes or gas leaks. These inspections can help keep you and your family safe. Save Money: Catching minor problems early can prevent them from turning into big, expensive repairs down the road. As they say, an ounce of prevention is worth a pound of cure! Negotiating Power: If you're buying a used RV, an RV pre purchase inspection is essential. It gives you valuable information about the RV's condition, which you can use to negotiate a better price. Insurance: Some insurance companies may require an RV inspection before they issue a policy. In relation to purchasing a used RV, let's discuss the RV pre-purchase inspection in greater detail. If you are looking to buy a used RV, this is a necessity. It's similar to having a house inspected before purchasing one. Do you want to be fully informed about what you're getting into? You will get a complete picture of the RV's condition thanks to the pre-purchase inspection, which will reveal any hidden issues. You can use this information to make an informed choice and avoid any unpleasant surprises down the road. Okay, so you're convinced that an RV inspection is a good idea. But how do you find a reputable RV inspection company? Here are a few tips: Ask for Recommendations: Talk to other RV owners, friends, or family members who have had RV inspections done. Get their recommendations and find out who they used. Check Online Reviews: Look for RV inspection companies in your area and read online reviews. See what other customers have to say about their experiences. Look for Certifications: Check if the company has certified RV inspectors on staff. This shows they have the training and expertise to do the job correctly. Get a Detailed Report: Ensure the company provides a detailed inspection report outlining any issues they find. Let's start with the do-it-yourself advice I promised. Although a professional inspection is always advised, you may maintain the condition of your RV between inspections by doing the following: Regularly Check the Roof: Get up on the roof (carefully!) and look for any signs of damage, such as cracks or leaks. Pay special attention to the sealant around vents, skylights, and other openings. Inspect Tires: Check your tire pressure regularly and look for any signs of wear or damage. Check Fluids: Make sure your engine oil, coolant, and other fluids are at the correct levels. Test Appliances: Regularly test your appliances to ensure they work correctly. Clean and Maintain: Keep your RV clean and well-maintained. This will help prevent problems and keep your RV looking its best. There you have it! All the information you need about RV inspection services. Remember that periodic RV inspections are an investment in both your peace of mind and the health of your vehicle. They can keep you safe while driving, help you avoid costly repairs, and ensure that your RV trips are solely enjoyable. Now, I have a few questions for you: Have you ever had your RV inspected by a professional? What was your experience like? What are some of the things you do to maintain your RV between professional inspections? If you're buying a used RV, would you get a pre-purchase inspection? Why or why not? 
More Posts

Book a Service Today