DIY RV Inspection Tips: Be Your Inspector!

December 24, 2024

Making a fantastic road trip plan? Before going down the open road, remember that your RV is your home away from home. Ensuring everything is in top condition helps prevent unexpected malfunctions or expensive repairs. You're thinking right now: "RV inspections? It sounds costly! Nonetheless, guess what? You can do a lot of the inspection yourself! Think of it as a fun little checkup for your trusty travel companion.


In this blog, we'll walk you through some simple DIY RV inspection tips that can save you a lot of hassle (and money!). From the roof to the tires, we've got you covered. So grab your tool kit, and let's get started!


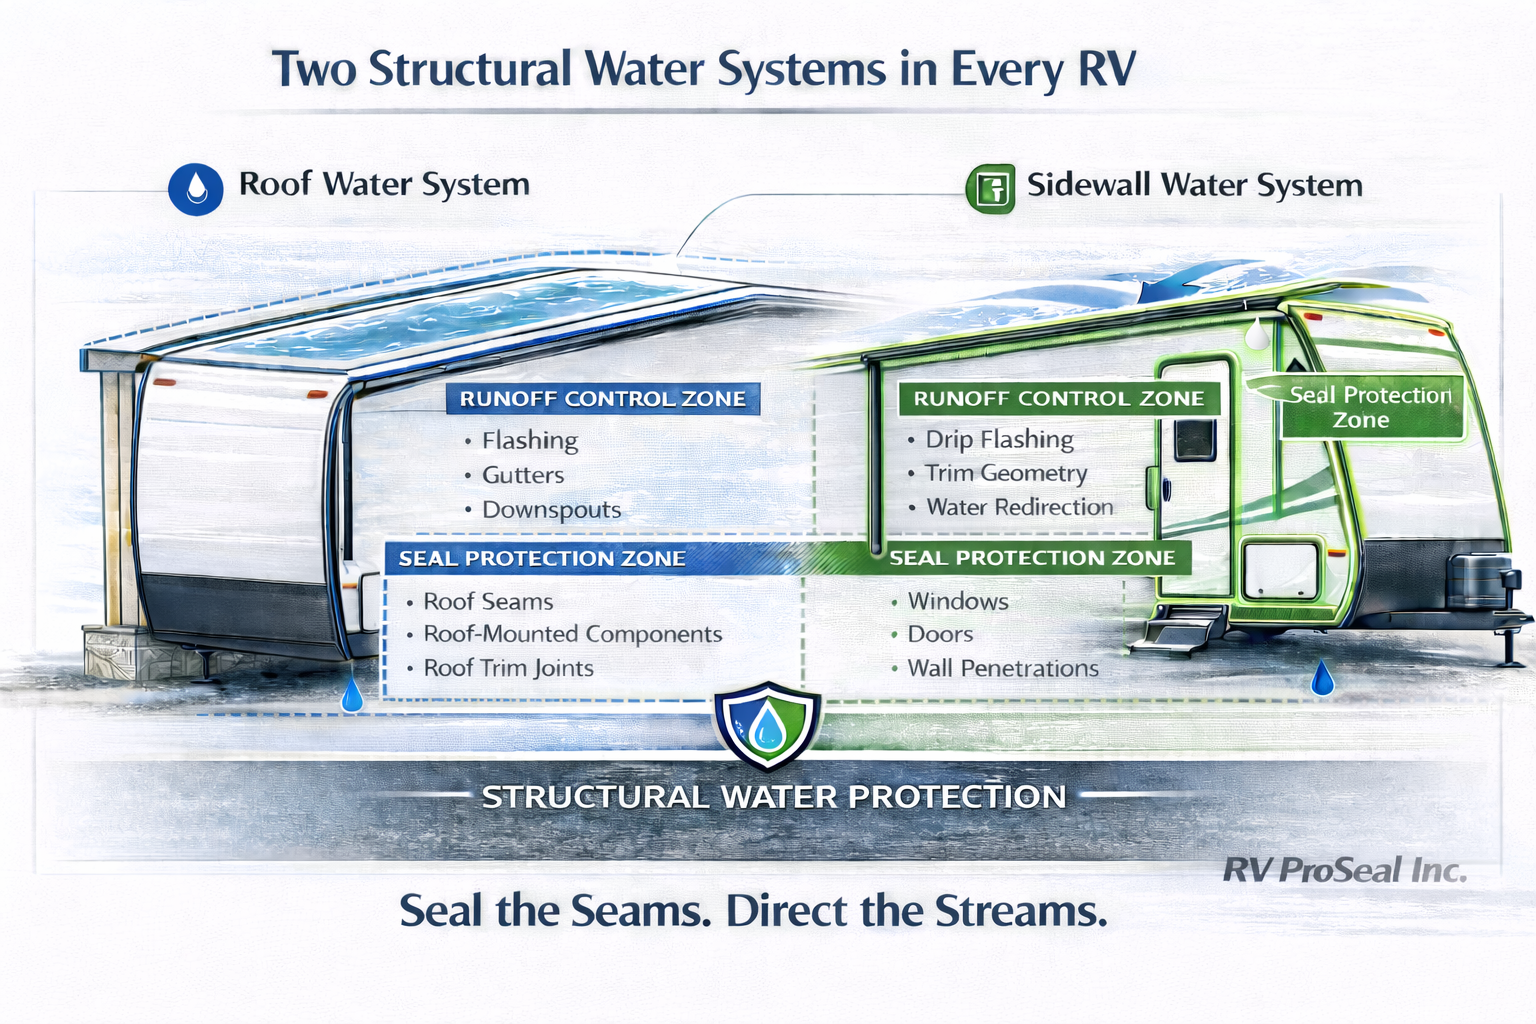
1. Roof Check: No Leaks Allowed!

The roof is the most essential part of your RV to inspect, as it takes the brunt of the elements. Imagine you're cruising down the highway, enjoying the scenery, when suddenly it starts raining...inside your RV! To avoid this soggy situation, carefully examine your roof for any cracks, holes, or hardness in the sealant.


Pro Tip: As you ascend a ladder, carefully inspect the seams and around any vents or antennae as you move around the whole roof. If you discover any cracks or gaps, it's time for proper sealant maintenance with prep, using the same lap sealant and add more sealant.


2. Tires: Rollin' Smoothly

Trailer tires often age out before the tread wares out.  Check the date stamps on the tires which will look like (08/15), meaning the 8th week of the 2015 year. Tires should be changed after 7 years of aging, particularly if they are not on the road regularly.  Check your tire pressure often; overinflated tires may wear down unevenly, and over or underinflated tires can cause blowouts. Look for any damage, including cuts, bulges, or unequal wear.


3. Plumbing: Keep Things Flowing

Nobody wants a plumbing catastrophe in their RV! Before leaving the house, test your toilets, showers, and faucets to ensure they run as they should. Search for any drips or leaks around the toilet and behind sinks. Remember also to check your water heater! Ensure it's heating water efficiently and there are no leaks around the tank.


Imagine  You're boondocking in the middle of nowhere, and suddenly you have no water! By inspecting your plumbing beforehand, you can avoid these inconvenient surprises.


Pro Tip: Put a shutoff ball valve  on the waterline leading to the toilet. RV toilet valves are made of plastic. If the toilet valve fails without having a shutoff ball valve installed, while on a camping trip, you will be forced to have no running water in the trailer at all.


4. Electrical Systems: Lights, Camera, Action!

Your RV's electrical system powers everything from your lights to your refrigerator. Make sure all your lights, outlets, and appliances are working correctly. Check your batteries for corrosion and make sure they're adequately charged. If you have a generator, test it to ensure it runs smoothly.


Think of it this way: Your RV's electrical system is like the nervous system of your home. It keeps everything connected and functioning correctly. A little inspection can go a long way in preventing any electrical hiccups on your journey.


5. Exterior Walls: A Solid Shield

Your RV's outside walls shield you from the elements, so they should be kept in excellent shape. Look over the walls for cracks, delamination, or other evidence of water damage. Check the seals of all wall penetrations' like, the windows, doors, outlets, etc., to ensure their water tightness and stop water damage issues.


Pro Tip: Look attentively at the walls from all angles as you go around your RV. Sometimes, the damage is minor. Hence, a careful examination is rather essential. Consider giving your RV a decent once-over, just like you would with your automobile before a lengthy road trip.

RV inspection DIY tips, Oakville, Ontario

Ready to Hit the Road?

Performing these simple DIY RV inspection tips can save you much trouble in the long run. Remember, prevention is key! By catching minor issues early on, you can avoid more significant problems down the road. Of course, if you're unsure about something or need a more thorough inspection, you can always call the professionals.


RV inspection services offered by a qualified leak RV inspection company can provide peace of mind and ensure your RV is ready for adventure. An RV leak inspector has the expertise and tools to identify potential problems you might miss.


Think of RV ProSeal as your partner in RV maintenance. We're here to help you keep your RV in top condition so you can focus on enjoying your travels. Whether you need help with roof repair, leak repair, or finding the proper sealant, we've got you covered. Contact us today and help us prepare your RV road trip!

You might also like

September 11, 2025
When rain starts sneaking through your roof seams or a skylight gasket lets go, the goal is simple: stop the water now and protect the interior until a mobile repair technician can take over. The steps below are road‑tested, safe, and meant to buy you time without creating a bigger mess for later. Think of this as a first‑aid kit for your RV’s seals. First, stay safe Water and height are a risky pairing. Before anything else: Park on level ground, set the brake, and wait out lightning or high winds. Turn off 120V power at the breaker if water is near outlets or fixtures. Use a stable ladder with a spotter. Shoes with a good grip beat flip‑flops every time. If conditions aren’t safe, pause and call mobile repair right away. Fast triage: find the source Leaks can travel along framing and show up far from the entry point. Start at the top and work down: Usual suspects: roof vents, skylights, AC shrouds, antenna mounts, front/rear cap seams, and ladder or rack penetrations. Edges and corners: perimeter mouldings and gutter rails often hide hairline gaps. Slide‑outs: torn wipers or flattened bulb seals let water wick inside. Windows & marker lights: failed butyl behind the flange; don’t confuse this with condensation. Wipe suspected areas dry with a microfibre cloth and watch for fresh trails. If you can’t pinpoint it quickly, stabilize the area with a tarp (details below) and book mobile repair. Your roadside leak kit (pack it now) Microfibre cloths and paper towels Isopropyl alcohol (70–99%) for surface prep Plastic scraper and utility knife Butyl tape (for flanges) RV roof repair tape (micro‑sealant tape) Non‑sag sealant for vertical seams; self‑levelling for horizontal laps Clear plastic sheeting and painter’s tape Soft roller for tape activation Nitrile gloves and safety glasses Small tarp, paracord or ratchet straps, and a pool noodle or foam ridge Temporary fixes that hold (without causing new problems) General rules: Clean, dry, then patch. Alcohol wipe → dry → apply. Warm products stick better; keep tapes/caulks inside the coach until use. Avoid silicone on EPDM—it rarely bonds well and complicates the permanent fix. EPDM or TPO rubber roofs Small seam or pinhole: bridge with roof repair tape, extending at least 50 mm (2") past the damage on all sides. Roll firmly to activate the adhesive. Cracked lap sealant at a vent: scrape loose debris, wipe, then add self‑levelling sealant around the flange. If rain is active, tape first and seal later. Fibreglass or aluminum roofs Hairline crack: Clean, dry, and apply repair tape. To avoid wrinkles, make relief cuts in the tape for curved corners. Loose trim screws: back out, add a tiny piece of butyl under the screw head, and snug (don’t strip). Cap with a dab of non‑sag sealant. Skylights and roof vents Leaking flange: wrap the perimeter with repair tape, pressing down onto both the flange and the roof membrane. Cracked lid: lay plastic sheeting over the lid and tape it to the housing as a rain bonnet. Replace the lid at the next stop. Slide‑outs Torn wiper seal: Retract the slide if safe, and add a temporary “gasket” by taping a strip of plastic across the top edge. Flattened bulb seal: A length of foam backer or even a pool noodle pressed against the side and taped can reduce water ingress until mobile repair can fit a new seal. Windows and marker lights Top‑edge weep: run painter’s tape as a small “drip cap” over the frame to shed water. Important: never block factory weep holes at the bottom of window frames. Tarping the right way (so it doesn’t pool or flap) A sloppy tarp can cause more damage than a shower. For short drives or overnight: Create a ridge with a pool noodle or soft foam down the centre to shed water. Anchor cords to frame points or wheels— not to awning arms or gutters. Pad sharp edges with cloth to protect the roof membrane. Keep the tarp tight; loose fabric will flap and scuff the roof. Dry the inside and prevent mould. Catch drips in pans; swap towels often. If you have shore power, run a small fan and a dehumidifier. Open cabinet doors near the leak to help air circulate. Wipe down wet wood trim quickly; standing water leaves stains and invites mould. When to stop and call a mobile repair technician immediately A tear larger than your hand Bulging or sagging ceiling panels Water near electrical panels, flickering lights, or a burning smell Storm conditions that make roof access risky At this point, containment (tarp and towels) is the smartest move. Book mobile repair and document everything. Document for a smooth hand‑off Take photos of the leak path, the roof area, and each temporary patch. Note the products used and the time you applied them. Keep any loose parts (old screws, cracked lids) in a labelled bag. This record helps the mobile repair technician plan materials and speeds up the permanent fix. What your tech will likely do next Expect a moisture survey with a meter, a controlled removal of temporary patches, proper surface prep, and compatible sealant or tape systems matched to your roof type. If hidden damage is found, they’ll propose a step‑by‑step repair plan so you’re not guessing. Need help now? If you’re on the shoulder with water finding its way in, patch what you can and reach out. RV Pro Seal offers on‑site, professional mobile repair for roof and leak issues—fast, friendly, and done right. We’ll get you watertight and back on the road with clear after‑care instructions.
June 20, 2025
Have you ever considered your RV more than just a vehicle? For many of us, it is a mobile home, an adventure base, and a significant investment. Like any valuable asset, your RV needs consistent care to stay in top shape and serve you for years. Regular RV resealing services are one of the most overlooked yet absolutely critical aspects of RV maintenance. This simple process can dramatically extend your RV's lifespan and save you from major headaches. The Unseen Threat: Why RVs are Vulnerable to Leaks Imagine your RV cruising down the highway, basking in the sun, or weathering a rainstorm. All these conditions put stress on its exterior. Temperature changes cause materials to expand and contract, road vibrations challenge every seam, and even seemingly harmless sun exposure can degrade sealants over time. These factors create tiny openings, almost invisible to the naked eye, where water can start its insidious journey into your RV's structure. So, what happens when water gets in? Structural Damage: Water can rot wooden frames, delaminate walls, and corrode metal components, weakening your RV's integrity from the inside out. Mold and Mildew: A damp environment is a perfect breeding ground for mold and mildew. These not only create unpleasant odours, but they can also pose serious health risks. Electrical Problems: Water and electronics do not mix. Leaks can short-circuit wiring, leading to costly repairs and potential safety hazards. Reduced Resale Value: A water-damaged RV will fetch a much lower price when it comes time to sell. No one wants to buy a rig with hidden issues. This is why proactive care, like consistent resealing and swift RV water leak repair , is not just about comfort; it is about preserving the very foundation of your investment. The Power of Prevention: How Sealing Maintenance Keeps Your RV Healthy Regular sealing maintenance acts as a robust shield, guarding your RV against the elements. Properly applied sealants create a watertight barrier over every seam, joint, and penetration on your RV's exterior – from the roof and windows to the cargo doors and vents. When you invest in professional waterproofing maintenance, you are not just getting a quick fix. You are ensuring: Long-Term Protection: High-quality sealants are designed to withstand UV rays, extreme temperatures, and vibrations, offering durable protection for years. Early Detection: During a resealing service, technicians meticulously inspect every inch of your RV, often catching potential issues before they become major leaks. This attention to detail is crucial for effective RV water leak repair . Expert Application: To use sealants properly, you need to know how to do it and have the right tools. Experts make sure there is good bonding and a smooth, even seal that really keeps water out. Tips for Keeping Your RV Leak-Free Want to be proactive about protecting your RV? Here are a few straightforward tips: Bi-Annual Seal and Sealant Inspections: Get up on a ladder a few times a year and visually inspect all seams and sealants on your roof and sidewalls. Look for cracks, shrinking, or areas where the sealant has pulled away. Feel for Soft Spots: Gently press on the walls, roofs and ceiling, especially near windows, vents, and lights. Any soft or spongy areas could indicate water damage. Address Issues Immediately: If you spot a problem, do not wait! Even a small drip can quickly escalate. Prompt RV water leak repair can save you thousands in the long run. Professional Check-ups: Consider having your RV professionally inspected and resealed every 2-5 years, depending on usage and climate. This is especially important if you are not comfortable doing the inspections yourself. By committing to regular resealing and partnering with a trusted RV leak testing company in Oakville , you are not just performing maintenance; you are making a wise decision that protects your significant investment. You are ensuring more enjoyable trips, fewer headaches, and a higher resale value when the time comes. Are you ready to give your RV the long, healthy life it deserves?
March 24, 2025
RV Inspection Services Myths Busted: Find the Right Experts
More Posts

Book a Service Today